CMS Help
Advanced Content Management System
- Media Libraries
- Admin. Details
This background is for all page authors.
Media can be put into and the contents of a media library can be viewed via the Mange Media button.
Selecting a Library the left side
On the left side of the page you can select the library from the libraries which the author can either view or edit (i.e., add/update/delete) content in (flagged by '-e-'). It is recommended that you open a second window to the media gallery to allow for editing or selecting media as you perform your edits.
Galleries {opt.}:
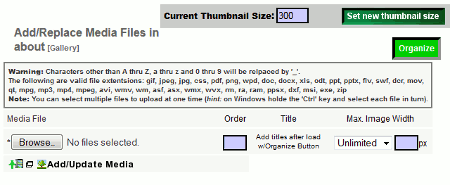
Some sites can designate a media library as a gallery. If you are in a library which has been designated as a gallery you will have the additional option of specifying the order in which the images are displayed as well as adding a title to each image. You will also have the ability to re-organize a gallery. The grey section in the image below will show up only in Gallery folders. Click here for an explanation of how to designate a directory as a gallery. Each image file in the gallery will have a thumbnail automatically generated when its uploaded or changed. The |.gallery tag will display these thumbnails and a title in the order you specify (see below). Clicking on the thumbnail will result in the full size image being displayed in a new window.
Adding media and Managing the library the right side
 If the author has permission to edit the contents of the library the top section will be similar to this image.
- Notice first if you have selected the correct media library. In this case its 'SampleGallery'
- You can select multiple media (images, documents etc.) to load at one time. However, the total file size is limited to 50MB as a protection to the server. Make sure you rename the files to something which will tell authors what they contain before you upload them (e.g, DCS00051 is not very useful). Only letters, numbers the '_' and '.' characters should be used in naming of files. If the system sees anything else it will silently replace the offending character with a '_'. Warning: this may cause files to be over written if the adjusted file name matches the name of another file.
- If you are uploading images you can select an image width from the drop down or enter your own. If the image is wider that this value the system will, after the image is uploaded, scale the image to the width specified. There are three reasons why you should scale the images yourself.
- The entire large image must be sent up to the server before it can be scaled and this can take time.
- The server's scaling has no fine control so it has to guess what is the best fit.
- To protect the server from attack the maximum size of all of the files being sent is limited to 50MB. If the files you send up exceed this limit the system will become confused. If this happens hit the back button and upload fewer files.
- Optional A site specific maximum width can be defined. If "unlimited" is selected for the maximum width the image will be constrained to this value. If a wider width is desired then it needs to be entered explicitly via the Configuration tab. NOTE: by default this field is NOT set so "Unlimited" will not constrain the images.
- After you have selected the media Click on the Upload Media/Docs button. When the process completes you can see the results below in the next section.
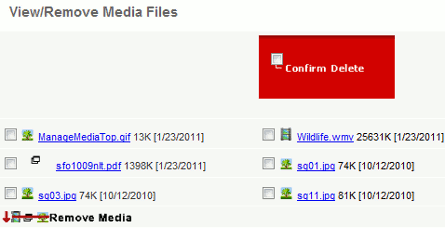
 Below this section is a listing of the media currently in the library (see image on the right). Note: If the author is not allowed to edit the library the Organize button, Confirm Delete check box and Delete Marked Media button will be missing.
- Clicking on the name of the file will open it in another window. Next to the name is the file size followed by the date the file was last changed on the server. Putting your mouse over the Image icon will cause a mini-sized version of the file to be displayed (actually the full image will be sent to the browser which will re-size it to 60x60 pixels so there may be a delay if the image is large)
- If you are authorized to edit this library and you want to remove an image
- Determine that its not used. The system can't do this for you, it could be used in too many places some of which it cannot examine (e.g., template files).
- Click on the Confirm Delete check box.
- Check those media files you want to remove.
- Click on the Delete Marked Media Button at the bottom.
- Gallery {opt}. Gallery support must be enabled for your site for this to apply.
- Media libraries are set up as a gallery when the media folder is created or using the Make Gallery button on this page.
- The maximum width of the thumbnail is set in configuration by the 'Admin' user.
- The current size is displayed at the top as the "Current Thumbnail Size"
- To change this enter a new value and press the "Set new thumbnail size" button. This allows the Admin user to specify different thumbnail sizes for different folders.
- In addition to specifying the file(s) and the maximum width, you can specify the relative order in which the image will be displayed (1 ... 999, default 500).
- When an image file is uploaded a thumbnail will automatically be created. If needed the thumbnail version of the image is shrunk to match Thumbnail files begin with 'TN_' followed by the file name of the full size file. They will automatically be removed if the parent file is deleted.
- Warning: an image placed in a library tagged as a Gallery can be used by any page author via the |.gallery:DirName:cols:rows.| tag if they know the name of the gallery.
- If you click on the word 'Organize' a pop-up will open which will display the current thumbnails in order allowing you to change the order, add/edit the titles, view the full size image (by clicking on the thumbnail) and delete one or more images. Note: move the popup and expand it as needed. The full size image will appear in the main browser window.
- If images in a gallery are going to be used go generate a rotating image (see Image Rotator elsewhere in this help) then it is critical that all the images in the gallery be exactly the same size. This can be done easily in photo editing software in two steps. Crop each image to the same size (e..g, 6x4 or 4x4 or 5x5 or 4x6). Then re-size the image to the same number of pixels (for example 800 pixels wide). Save that image with the name you want to use when you upload it. This will ensure that the display of the page will not jump as each new image is displayed (assuming none of the original images were narrower than the maximum width specified for that gallery.
- Media libraries are set up as a gallery when the media folder is created or using the Make Gallery button on this page.